Hey there! Most of you know, but in case you didn't, we're adopting!! EKK! I'm so excited! We made the announcement a few weeks ago, but while we were keeping it under wraps, I had time to think about how I wanted to tell our family & friends, and I didn't want it to be nonchalantly because, for us ladies that have infertility issues, this is our "Pregnancy Announcement".
We were able to tell the Mr's family in person over dinner, but for my family, who are all in different states, I wanted to do a cute egg announcement that you see all over pinterest & etsy. The thing I didn't like was the price tags that accompany said cute egg announcements, or the worry that the eggs would break en route to them, so I decided to make my own and send them the photo! And this is how I did it-
Step 1: Take out your egg(s) and let them sit on counter to make them room temperature for a day or so.
Step 2: Take a safety pin or other long needle and gently poke/drill into the egg on a pointy end, to make a small hole. Do the same to the other pointy end of the egg. After the holes are made, poke around in the egg GENTLY to try and break the yoke and membranes all up.
Step 3: With two fingers, (I used thumb & pointer finger) put egg in between fingers covering the holes you just made- tightly. Then, shake the crap outta that egg! You're trying make sure all the yoke and membrane is as broken and tiny as they can be because...
Step 4: Get ready, take a couple of deep practice breathes, and gently put your mouth on one end over the hole, and blow with all your might! You MUST get all the insides of the egg, out! Do this over the sink to keep from destroying your whole kitchen!
Step 5: After all junk is out of egg, then fill a bowl with warm soapy water. Gently- (I can't stress this enough throughout this whole project- deal with this egg as gently as you can) - dunk egg under water so that some of the warm soapy water gets inside the egg & washes it out a bit. Do this 2-3 times, then drain egg so all water is out of it. Lay it aside to dry completely overnight.
*At this point, if you're going to paint your egg with craft paint or glue glitter on it, do it at this point, and skip steps 6 & 7, go to step 8.*
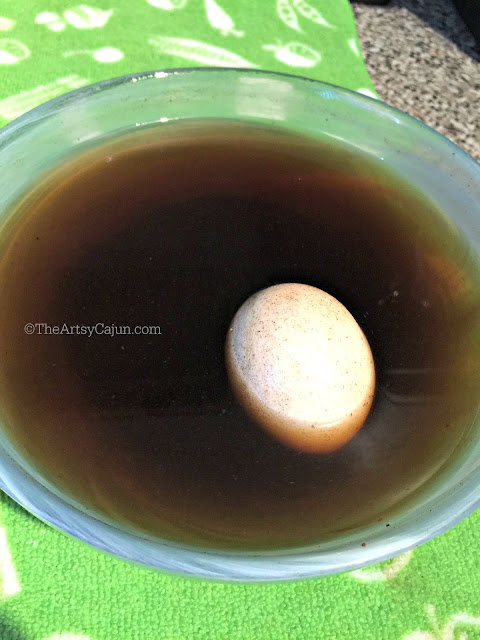
Step 6: Empty the water out of the bowl, fill back up with warm water. Take coffee grinds (could be from that morning's coffee if you'd like to recycle) and put in bowl. Stir a bit until water starts to get muddy. Then, dunk egg in bowl, making sure to rotate every hour or so. I did this step for a whole day, turning egg a tiny bit every hour to make sure the coffee water stained the egg evenly.
Step 7: Take egg out of water, making sure to drain all water out, and lay somewhere safe overnight so it can dry. Your egg should look a bit dirty.
 |
| Coffee stained egg on left, untouched egg on right. |
Step 8: You're going to make your paper announcement. I simply took patterned paper (off my grocery list pad) and write all fancy, "We're Adopting". You could write whatever message you want on it, like "We're Pregnant", or maybe if this egg is going to your parents, "You're going to be a grandparent" just whatever fits your needs, write it on here. I choose to tear the paper to make it a little rough looking, but you could do whatever you'd like here.
Step 9: Take a toothpick, put it on one edge of the paper, and the wrap the paper around the toothpick as tightly as you can. The goal here is to try to roll the paper small enough to fit through the hole, and go inside the egg.
Step 10: Slip the paper off the toothpick, and see if you can roll it to make it even smaller. Then, AS GENTLY AS YOU CAN- insert the paper into the egg through the hole. I cracked my egg here, so if it's not fitting, gently slide the paper back out, and try rolling it as small as you can!
Step 11: Once you get it in, you
could be finished. But I love glitter and had to add glitter in mine! I tore a corner off a sheet of paper, rolled it into a tiny funnel, put it gently in the hole of the egg, and poured glitter in it. I didn't fill it up all the way, maybe 1/3 filled.
Step 12: YOU'RE DONE! If you choose to ship this, make sure to add enough moss or packing material so that egg doesn't budge at all! Then, put it in a small box, like one that fits a coffee mug would be perfect. You then could use a larger box, putting packing peanuts to secure the smaller box in the middle. Maybe like a shoe box? Something like that. Just make sure the egg is well taken care of in there!
I choose to make a series of photos, and send that to my family. Check it out:
I hope you've enjoyed this tutorial! Please leave a comment below about the best thing you've DIY-ed this year!


